Desktop Alert Software v.4.4 by BusinessAlerts
Dedicated Version Guide
Latest Version: 4.4, Rev.3
Last Updated: 23 July, 2009 7:00 PM IST
Contents Pages
1. Introduction……………………………………………………………………………. 3
1.1 How does it work? …………………………………………………………… 4
1.2 Who might benefit from it? …………………………………………….. 5
1.3 Key Features ……………………………………………………………………. 7
1.4 Hardware and Software Requirements …………………………… 10
1.5 Licensing ………………………………………………………………………….. 10
2. Server Component (called Control Panel) ………………………………. 11
2.1 Pre-requisites ………………………………………………………………….. 11
2.2 Customization …………………………………………………………………. 11
2.3 Installation ………………………………………………………………………. 11
2.4 Usage ………………………………………………………………………………. 11
3. Client Component (called Desktop Application) …………………….. 12
3.1 Pre-requisites ………………………………………………………………….. 12
3.2 Customization …………………………………………………………………. 12
3.3 Installation & Activation ………………………………………………….. 12
3.4 Usage ………………………………………………………………………………. 13
4. Alert Campaigns …………………………………………………………………….. 15
4.1 What is a Alert Campaign ………………………………………………… 15
4.2 Creating a New Alert Campaign ……………………………………… 15
4.3 Re-Customizing Existing Alert Campaign ……………………….... 19
5. Sending Alert Messages ………………………………………………………... 19
5.1 Add & Manage Subscribers ……………………………………………… 19
5.2 Add & Manage Message Templates ……………………………….. 23
5.3 Create and Send Alert Messages …………………………………….. 26
5.4 Check the Audit Reports …….……………………………………….….. 29
6. Sending SMS Messages………………………………………………………….. 34
6.1 Add & Manage Mobile Numbers ……………………………………. 34
6.2 Create and Send SMS Messages ……………………………………… 37
6.3 Check the SMS Audit Records …………………………………………. 39
7. API Usage ……………………………………………………………………………… 42
7.1 Who needs it ………………………………………………………………….. 42
7.2 How to use it ………………………………………………………………….. 42
8. Desktop Alert Administrator ……………………………………………….… 43
8.1 Pre-requisites …………………………………………………………….…… 43
8.2 Installation & Activation …………………………………………….…… 43
8.3 Sending Desktop & SMS Alert Messages …………………….….. 44
9. Optional Features …………………………………………………………….…… 45
9.1 Alert RSS / XML Feeds …………………………………………………….. 45
9.2 Alert Surveys ………………………………………………………………….. 46
9.3 Personal Alert Messages ………………………………………………… 49
9.4 Encrypted Alerts (256 bit) ……………………………………………… 51
10. Help ……………………………………………………………………………..……... 51
10.1 FAQs …………………………………………………………………..…… 51
10.2 Forum ……………………………………………………………………… 52
10.3 Call Us …………………………………………………………………….. 52
10.4 Chat with us ……………………………………………………………. 52
10.5 Email Us ………………………………………………………………….. 52
1. Introduction
Desktop Alert and Mobile Alert Software by BusinessAlerts offers an Instant and Secure communication channel between a business and its customer.
Its offers Instant Delivery of Alerts
Messages to Customer Desktop as well as SMS Alerts to their mobiles. It can
also undertake Customer Surveys as well as send Personal Messages to your
customers.
It has No Spam or Virus Issues, has Multiple-Language Support, is Economical,
and needs No other software to run. Alerts Messages are Rich Text / HTML /
Audio and Video Capable. There is a Full Audits of messages sent / viewed. It
has the Ability to Create Time Limited Trial or Demo versions as well as Paid
Subscriptions. It also has Full Desktop Alerts API Implementation which can
automate the various webmaster tasks. It has 256 bit Encryption features which
protect your data from hackers.
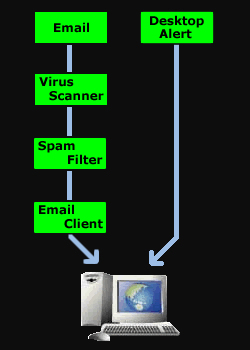
1.1 How does it work?

- Application Tier: This comprises the application installed on client / customer computer. This is small application less than 1 MB which is easy to install. This application interacts with Interface Tier.
- Interface Tier: This is intermediate tier which acts as an bridge between Server Tier and Application Tier. This leads to improved reliability and better bandwidth efficiency. Application Tier contacts this tier for any new messages at periodic intervals.
- Server Tier: This is tier which is responsible for managing messages to be sent on alerts network. This is fully redundant and scalable to allow for any contingency. Interface Tier is in constant contact with this tier for modulation and delivery of messages.
In Dedicated Version of Desktop Alerts, Interface Tier and Server Tier are located at the Service Provider Server Facility while Application Tier is installed at their Customer Desktop.
1.2 Who might benefit from it?
All business and websites can use our Desktop Alerts to their advantage.
- Business Portals wanting to push secure messages to clients in real time.
- Entertainment Portals to push latest news and gossip.
- News Portals wanting to push latest news to their subscribers.
- E-Commerce Portals wanting to push the latest deals to their customers.
- Job Portals wanting to push the Job Openings.
- Blood Banks to push alerts for rare blood groups.
- Contests / Polls Portals to push latest Events and Results.
- Financial Institutions to push latest reports.
- Membership websites wanting to push messages to their members.
- Educational Institutions to push latest happenings and events.
- Sports Portals to push latest matches and scores.
- Companies to send secure messages to their internal network.
These are just some of the uses of Desktop Alerts, there can be many more.
Do
you use Emails for sending messages to your customers?
If Yes, you should look at using Desktop Alerts instead or in addition to
emails because :
- Most emails sent by a company lands up in recipient spam filters.
Our Desktop alerts, on the other hand, face no spam issues.
- Emails can often be forged thus leading to false identity and phishing attempts by unscrupulous people.
There is no such issue with our Desktop Alerts.
- Many Customers frequently change their Email addresses thus preventing the delivery of your email.
Our Desktop Alerts doesn't require any Email address to deliver your messages.
- Many Email Clients like Outlook may not show your message as you want it to how. Many Email Softwares will block the images thus rendering your message less appealing.
Our Desktop Alerts will deliver your message as it is.
- Sending emails won't guarantee you that they will be read the same day or may not be read at all due to spam or bulk filters.
Our Desktop Alerts will guarantee that messages will be delivered at the time you set.
- Using Emails, you can't have good Audit of messages read by your members.
Our Desktop Alerts gives full Audit and Stats on Application installed, Messages sent and Messages Read.
- Emails can't be used to build upon your brand identity since it is generic medium.
But our Customized Desktop Alerts will make your Brand always visible on customers desktop and help immensely in building up your brand's image.
1.3 Key Features
Alerts on the Desktop
Our Desktop Alert application delivers the alert messages on your customer's computer screens within few seconds ensuring high visibility and impact of your messages.
Alerts on the Mobile
Our Mobile Alert application delivers the alert messages on your customer's mobile phones as SMS within few seconds ensuring that your mobile customers do not miss out on important alerts.
256 bit Encryption
Our Desktop Alerts Software uses industry standard 256 bit encryption so that communication between the software and the server is secure and can't be intercepted.
Instant Delivery of Alerts
Our combination of a three tier mechanism and fast algorithms ensure that your messages reach your customers within seconds. Moreover you have full control over timing of your messages so you can decide when your message will be seen by the customer.
Branded Application customized to your needs.
Customization includes but is not limited to application icon, splash graphic, window dimensions, hyperlinks and titles.
Multiple Alert Campaigns
You can even add more than one Alert Campaign to the same Control Panel and manage all the campaigns from one place. Each Campaign has its own Custom Branded Desktop Application.
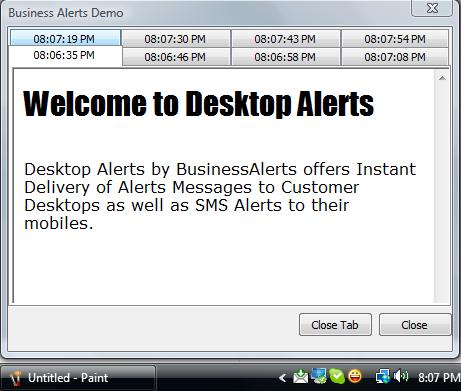
Multiple Concurrent Alert Messages
Multi Threaded Application doesn't get blocked by the un-responded messages, it continues to show the new messages in new tabs so you can be confident that your messages will reach your customers in time.
Multiple Templates for your use
You will be able to use lots of custom pre-designed templates to help you send messages quickly. Further, you will be able to create your own templates and use them in your campaigns.
Spam Free and Virus / Malware Free
You will be able to deliver your messages to your customers bypassing clutter of spam emails and virus attachments. Also, your customers can be assured that their privacy is protected with us since this software doesn't collect any information from their computer.
More Efficient and Effective than Emails
Studies have proven that our Alerts method is a much more efficient and effective way to deliver your messages to your customers which will result in a greatly increased response rate.
No Extra Software required to run
Desktop alerts is a fully standalone application and doesn't require any other software other than your current operating system to function.
Create Rich Text, HTML, Audio, Video & Flash Content Alerts
You can embed any rich text, html, audio, video, flash components in your messages to give your customers a more enriching experience.
Send Personal Alerts
Desktop Alerts gives you the capability of sending alerts to just one member at a time thus making it a person-to-person message.
Send Group Wise Alerts
You have the ability to send Alert Messages to certain Groups of people satisfying one or more criteria thus allowing you pin point accuracy.
Full Audit Trail
Full Audit Trail of Messages sent / viewed / deleted is available in the Control Panel so that you can gauge effectiveness of your campaigns.
Full Featured API Implementation
If you wish, you can use Desktop Alerts API to fully automate your sending of alerts without leaving your website. API provides you with easy to use methods to manage your alert messages.
Desktop Surveys using Alerts
Our Desktop Alert software allows campaign owners to take Surveys from their customers thus getting important feedback about their services. Campaign owners can create and manage surveys as well as see the results in the control panel.
Mobile Surveys using SMS
Our Alert software allows campaign owners to send Survey Request SMS to their customers mobiles and collect responses from them thus getting important feedback from their mobile customers about their services. Every SMS is tracked for its response
IP / Geographical Location based Alerts
You have the ability to send Alerts only to desktops with a particular IP address or desktops in any particular geographical location.
Create Time Limited Trials
You can provide Alert service to your customers on a Trial basis by creating a Time Limited Trial Code from within the Control Panel which will expire after a stipulated time period.
Automatic Updates
Desktop Alerts software will update itself whenever a new update is available so that any bugs / new features / security enhancements can be taken care of automatically.
Personal Reminder Service
Your Customers will also be able to use the Personal Reminder Service Feature of Desktop Alerts in which they can set Reminders for specific events so that the Alert is issued at the desired time.
Issue Emergency Alerts
Desktop Alerts provides you with capability of issuing Emergency Alerts which causes Alert to be displayed very prominently on user desktop along with an alarm siren sound and the user has to acknowledge and click on the alert to clear it from the screen.
Advanced Control Panel
Business Alerts provides you with an advanced control panel free of charge to manage your alerts. You will be able to manage all aspects of the alerts and examine their audit trails.
1.4 Hardware and Software Requirements
1 Server Component (Control Panel):
· Web Server (Apache / IIS / any other)
· PHP Support (at least version 5.0 or above)
· MySQL Database Server (at least version 4.3 or above)
2 Client Component (Desktop Application):
· Windows 2000 / Windows XP / Windows Vista / Windows 7
Any Special Firewall Configuration: None because Desktop application uses Standard HTTP Port (80) for communication.
Any Proxy Configuration: None because Desktop Application uses Pre-configured Proxy Information from Internet Explorer settings.
1.5 Licensing
License for “Dedicated version of Desktop Alerts” entitles you to
· have your own Dedicated Control Panel on your own server
· Offer unlimited messaging capabilities without any usage charges.
· You will get One Alerts Campaign and its Custom Desktop Application but you can also order more Campaigns and application as per requirements. Additional Campaigns will be charged extra.
You can Request for Quote for Dedicated Desktop Alerts Software by submitting Form at http://www.alertsdesktop.com/desktop_alert_signup.php?product=dedicated
2. Server Component (called Control Panel)
This component comprises set of PHP Scripts and has to be installed on the Web Server and requires PHP 5 or above and MySQL Database 4.3 or above.
2.1 Pre-Requisites:
· Web Server (Apache / IIS / any other)
· PHP Support (at least version 5.0 or above)
· 1 MySQL Database (MySQL Database Server at least version 4.3 or above)
2.2 Customization:
Some of the features which can be customized or removed as per requirements
· SMS Feature
· Encryption Feature
· Personal Message Feature
· Personal Reminder Feature
· Add-on Managers Feature
· Emergency Message Feature
· IP / Geo-location feature
2.3 Installation:
Control Panel can be installed by any experienced webmaster or it will be installed by BusinessAlerts Technical Staff free of any charges. All installation instructions are provided with the installation file.
2.4 Usage:
After installation, you can login into the Control Panel using your login and password and start managing your Alert Software. Please refer to Section 4 to see basic functionality of sending alert messages and Section 5 for sending SMS messages.
3. Client Component (called Desktop Application)
This component comprises Windows based Desktop application which sits on your customer desktop and deliver instant messages to your customers.
3.1 Pre-Requisites:
· Windows XP (SP2 or later) / Windows Vista / Windows 7
3.2 Customization:
Almost all features can be customized as per the requirements
· Application Icon
· Application Links
· Alert Sounds
· Alert Check Intervals
· Size of Alert Windows
· Position of Alert Windows
· Any Advertisement s add-ons
3.3 Installation & Activation:
· Windows Installer (single exe file) will be provided with each Desktop Alert Campaign which will install application on customer computer.
· After installation, activation screen will come up where customer has to enter his/her Subscriber Email and password. Please refer to Section 4.1 to see how to add Subscribers.
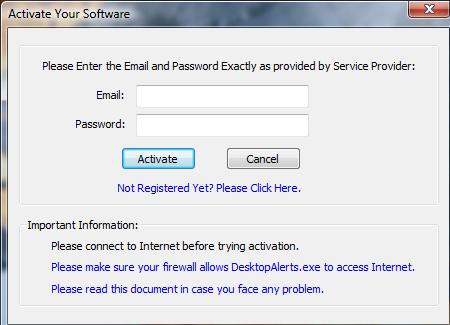
· On successful activation, application will show a Success message otherwise Error message will be shown.
3.4 Usage
· After successful installation and activation of the Desktop Alert Application, Alert messages will start coming automatically from the Control Panel.
· Customer can even better manage the incoming messages using many options available using the Context Menu (Right Click on System Tray Icon)
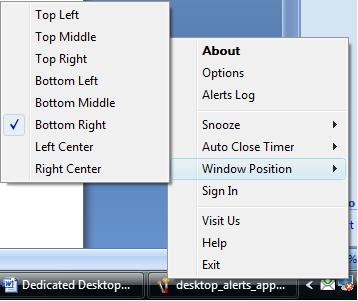
Menu Items:
About:
Here you can see Desktop Alerts software version, Copyright Notices, Disclaimers and Links to your website.
Options:
Here you can set various options like Sound Alert in which you can select default or customized sound to play when new alert arrives.
Snooze:
Here you can set Alert application to sleep mode over time interval. No Alerts will be shown during this period.
Auto Close Timer:
Here you set the time taken for Alert window to close itself automatically. You can also set this option "Off" so that Alert Window doesn’t go away until you press the button. This can be useful for important alerts.
Window Position:
Here you can set the position of Alert Window which pops up whenever there is new alert. You may choose from any of the 8 positions across the screen namely Top Left, Top Middle, Top Right, Bottom Left, Bottom Middle, Bottom Right, Left Center and Right Center. With this option you can avoid too much clutter around system tray area of your desktop.
Sign In / Sign Out:
You can Sign out of Desktop Alerts so that no Alerts are fetched from your account till you Sign In again. This can be useful when you are away from computer for extended periods of time.
Alerts Log:
Here you can open previous Alerts Log window showing all previous alerts as they appeared. This can be useful in case you didn’t saw them before. You can clear the Log when required.
Visit Us:
This opens up website of your service provider.
Help:
Help Page.
Exit:
Here you can close the alerts application
4. Alert Campaigns
4.1 What is a Alert Campaign
Alert Campaigns are fundamental unit of our Desktop Alert System. All the Alert Messages, SMS Alerts, Subscriptions and Reports are categorized campaign wise.
Each Alert Campaign comprises of
· Separate Space in Database and Website Pages
· Custom Desktop Alert Application
You can have more than one campaigns running at the same time. Each campaign will have its own customized desktop alert application and can be managed independently of other campaigns.
4.2 Creating a New Alert Campaign
Login to your Control Panel and go to the “New Campaign” page in the “CAMPAIGNS” Section. There you can give a Name to your Campaign and “Proceed to Software Customization”.
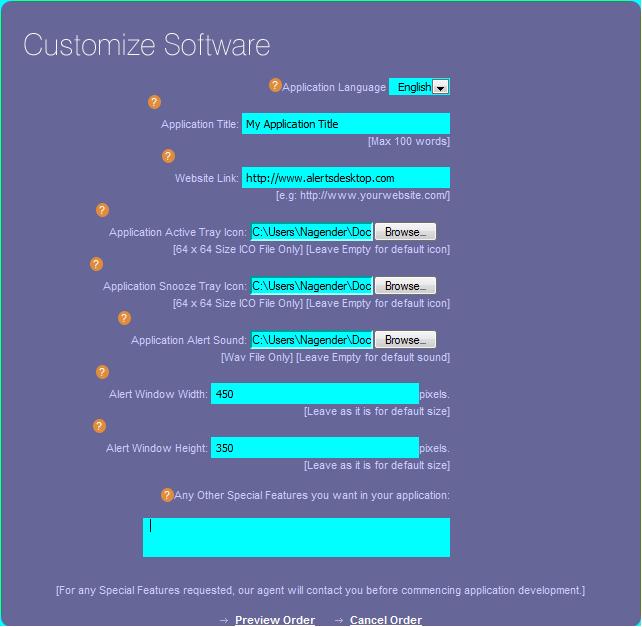
On Software Customization page, you will see various Application parameters you can customize. They include Application Language, Website Link, Application Active / Snooze System Tray Icons, Alert Sound, Alert window height and width and any other Special Feature required.
After you fill in all the values and click submit, you will go to the preview screen where you can confirm all the parameters. If there is any error during uploading of some file, you will see the error message on Software Customization page.
After you preview and confirm the order, order details will be sent to us and we will start working on creating the new application which may take 5 minutes to few hours depending upon features required.
General Help for Customizing Application
Alert Campaign: This is the fundamental unit of our Desktop Alert System. All the Alert Messages, SMS Alerts, Subscriptions and Reports are categorized campaign wise.
Typically you will create an new Campaign when you need your own Brand Identity for sending your Alert Messages. You will get a Customized Desktop Alert Application for each of your campaigns. You can create as many campaigns as you want and manage them easily using this control panel.
New Campaign: You can create a New Campaign by filling in below mentioned parameters for the Control Panel and Custom Desktop Application.
- Campaign Name: This is the Name of the Campaign for listing and selection purposes in the control panel. You will see this name in all the drop downs so you select any campaign which you need to work upon.
- Application Language: This is the Language in which Desktop Alert Application will be compiled. This will affect all the Window Titles, Messages and Menus.
- Application Title: This is the Title of the Desktop Alert Application which will appear on Application Installer, its various Windows including About Us. You should keep it less than 50 characters and should be Unique Identifier for this Campaign.
- Website Link: This is the link to which user will be forwarded to when it clicks "Visit us" in the application menu.
- Application Active Tray Icon: This is the Icon which will appear in user system tray when the Alert application is Active (i.e. Not Snoozing / Not Logged Off). You should put here a valid Icon File (extension .ico) preferably 64x64 pixels in size or you can just leave it empty to use the Default Icon. Please note that improper icon file may lead to failure of your application to compile properly. If you don't have the icon file but have some other image file, you can send request to help desk for converting your image file to the icon file.
- Application Snooze Tray Icon: This is the Icon which will appear in user system tray when the Alert Application is Snoozing or is Logged Off. You should put here a valid Icon File (extension .ico) preferably 64x64 pixels in size or you can just leave it empty to use the Default Icon.
- Application Alert Sound: This is the sound which will be heard by the user when New Alert arrives at the Desktop. You can put your own wav file (extension .wav) here or you can just leave it empty to use the default sound which is windows notify sound. Please note that improper wav file may lead to failure of your application to compile properly. If you don't have the wav file but have some other sound file , you can send request to help desk for converting your sound file to the wav file.
- Alert Window Width: This is the width of the desktop window which will popup and shows the Alert to your subscribers. You can choose any numeric value here but keep in mind the total width of your user's desktops (ranging from 800 pixels to 1600 pixels) and put a value which will show alert reasonably on all the desktops.
- Alert Window Height: This is the height of the desktop window which will popup and shows the Alert to your subscribers. You can choose any numeric value here but keep in mind the total height of your user's desktops (ranging from 600 pixels to 1200 pixels) and put a value which will show alert reasonably on all the desktops.
- Any Special Features: Here you can put any special instructions to be applied while creating the Custom Alert Application. For any Special Features requested, our agent will contact you before commencing application development.
While the application is being created, you will see Application “In Development” screen like this.

When ready, application will be available for download from “Current Campaigns” page.
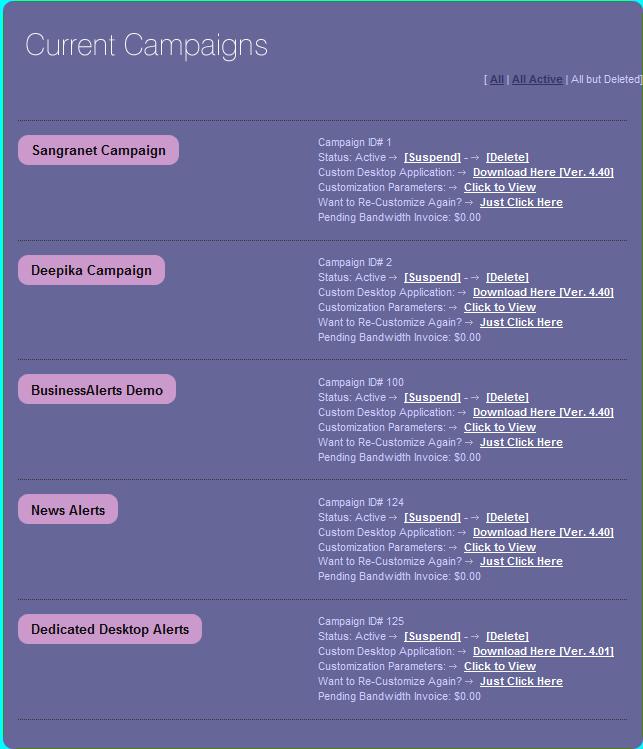
4.3 Re-Customizing Existing Alert Campaign
To re-customize your existing campaign application, you just have to click on link next to “Want to Re-customize again?” And you will be taken to the Software Customization Form as shown in Section 4.2.
You can just fill in the values again and Re-Submit Customization Order which will be processed promptly by us. There is no limit on no of re-customizations you can do, so that you can keep trying till you get the required looks and functionality of the desktop application.
5. Sending Alert Messages
Simple steps for sending Alert messages to your subscribers for the first time are
1. Create Alert Subscriptions (see Section 4.1) and send “Subscriber Emails” and “Password” along with the link to download Desktop Application Installer to your subscribers so that they can install and activate their applications.
2. Modify Default Alert Template or Create New Template (Section 4.2) for your Messages.
3. Create New Message (Section 4.3), select the Template to use and Send the Message.
5.1 Add & Manage Subscribers
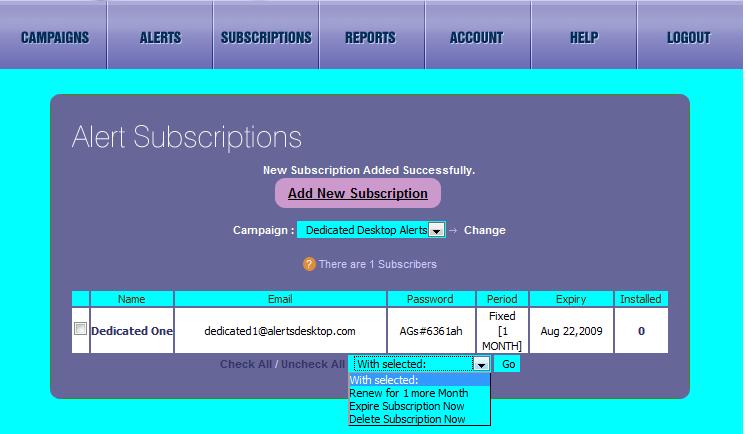
Login to your Control Panel and go to the “Alert Subscriptions” page in the “SUBSCRIPTIONS” Section. Here you will see all your current subscriptions.
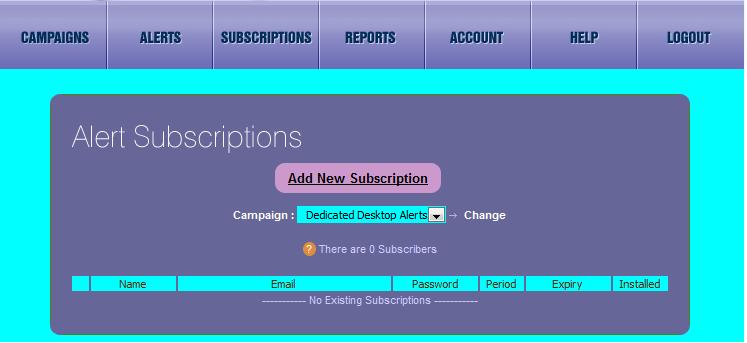
To add a new Subscription, click on “Add New Subscription” Link and you will see form to create new subscription. You can either create a Fixed Time Period Subscription Suitable for Demo / Trial / Fixed Quotas. This type of subscription expires after a fixed time period unless you manually renew it from the control panel.
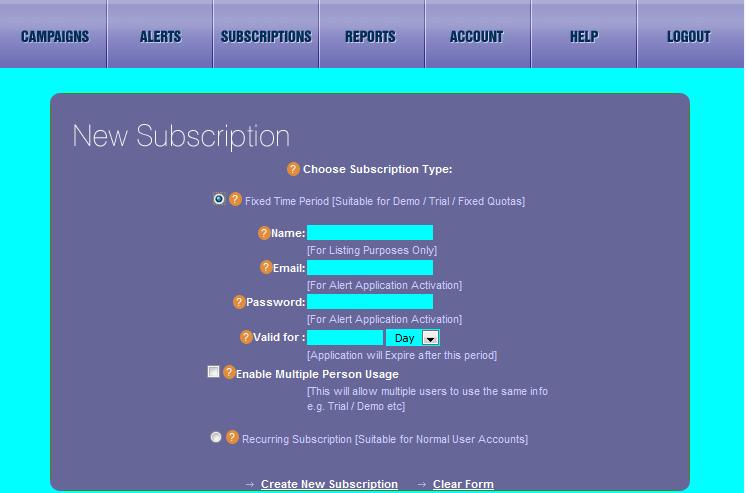
Or you can create a Recurring Subscription [Suitable for Normal User Accounts]
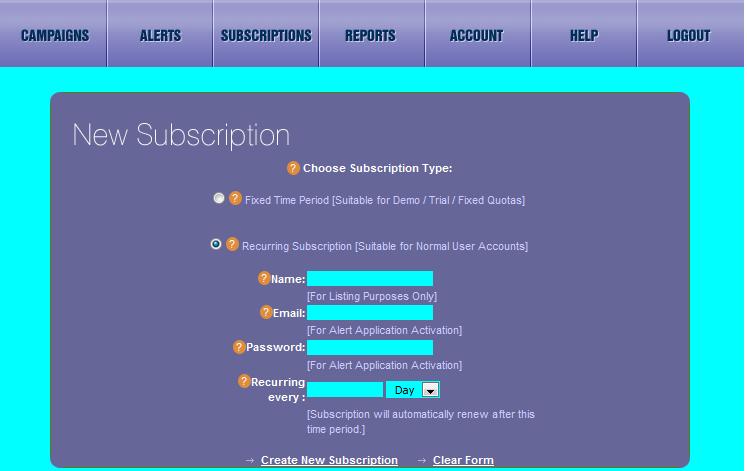
Recurring Subscriptions don’t expire and automatically renew after the given period. You will need to manually expire or delete this subscription whenever you need to disable that subscriber.
General Help for Creating Alert Subscriptions
Alert Subscriptions: These subscriptions are meant for managing your Campaign Subscribers.
Typically you will create a subscription for your subscriber and send that information (email and password) to your subscriber along with download link to your custom desktop alert application. Subscriber can then install the application and activate it using the subscriber information you sent to them. After successful activation, your subscriber will start receiving all the alerts you send to its campaign.
New Subscription: You can create New Subscription for each of your subscribers or you can use same subscription for many of your subscribers as in case of Trial / Demo versions.
Fixed Time Period Subscription: This Subscription type is fixed time period subscription in which subscription expires after a defined time interval. This type of subscription is useful for creating demo or trial or group based alert solutions. Various Fields of this type of Subscription are
- Name: This is the Name of the Subscription just for listing purposes in the control panel so you can identify it later.
- Email: This is the Subscription Email which you will send to your subscriber so that he can use this as Username for Activating his Alert Application. You can put any email address here but best practice is to put the subscriber email address so that you could identify it in future.
- Password: This is the Subscription Password which you will send to your subscriber so that he can use this as Password for Activating his Alert Application. You should avoid using easy to guess passwords here otherwise any other person may be able to use this subscription.
- Valid for __ (Hour / Day / Month / Year): Here you can define when this subscription will expire. If you put say 1 in the text box and select "Month" from drop down, it becomes 1 Month Subscription and it will expire 1 Month from Now. So, all your subscribers of this subscription will receive expiry notices 1 month from now and alerts will be stopped for their applications thereafter.
- Enable Multiple Person Usage: This option enables this subscription to be used by more than 1 person. This type of requirement generally exists in Trial / Demo versions and you can enable this option by checking the check box. But remember that you can only manage group as a whole and not individual subscribers. For managing individual subscribers, use the recurring subscriptions.
Recurring Subscription: This Subscription Type is generally used for normal individual subscriptions in which you give unique subscription info (Subscription Email and Password) to each of your subscribers. This enables you to manage each subscriber independently for renewal / expiry etc. This type of subscription automatically renews and does not expire till you manually expire it from Alert Subscriptions page. Various Fields of this type of Subscription are
- Name: This is the Name of the Subscription just for listing purposes in the control panel so you can identify it later.
- Email: This is the Subscription Email which you will send to your subscriber so that he can use this as Username for Activating his Alert Application. You can put any email address here but best practice is to put the subscriber email address so that you could identify it in future.
- Password: This is the Subscription Password which you will send to your subscriber so that he can use this as Password for Activating his Alert Application. You should avoid using very easy to guess passwords here otherwise any other person may be able to use this subscription.
- Recurring every __ (Hour / Day / Month / Year): This denotes the recurring period of the subscription. For e.g. if you 1 in text box and select Month in drop down, it becomes 1 Month Recurring Subscription and it will renew each month until you expire / delete it.
After adding subscription, you will be able to manage subscription (Renew / Expire / Delete) using dropdown provided.
5.2 Add & Manage Message Templates
Alert Message Templates are HTML based templates and act as a framework (or scaffolding) which is combined with Alert Message to create a Complete Alert which is then delivered to the desktop.
Login to your Control Panel and go to the “Alert Templates” page in the “ALERTS” Section. Here you will see all your current templates.
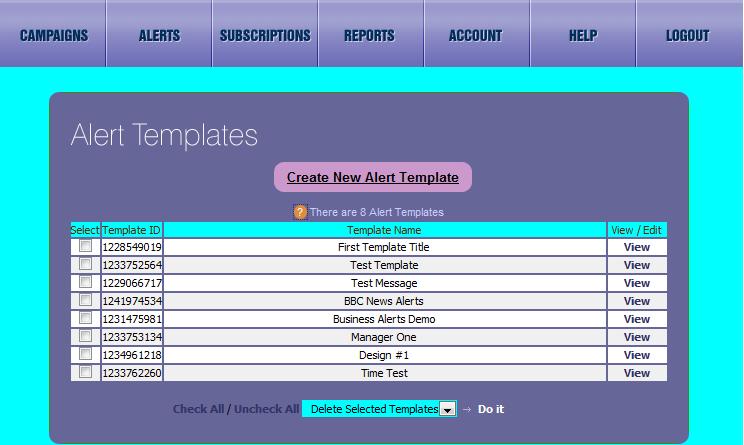
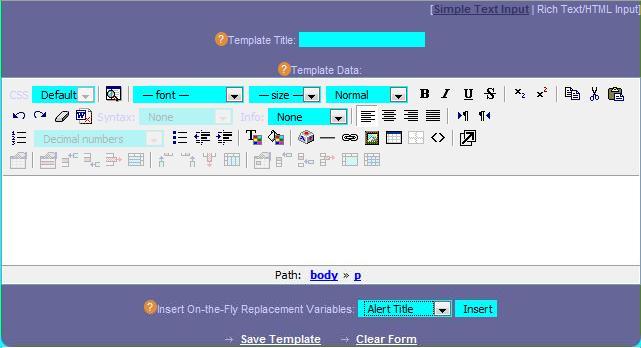
To create a New Alert Template, click on “Create New Alert Template” and you will see the New Template Creation Form with WYSIWYG Editor. By using this editor along with the “Replacement Variables”, you will be able to create the New Alert Template.
Please make sure you use proper Replacement variables (Alert Message is a must) while designing Alert Templates. To use any replacement variable, just select it from dropdown list and press Insert button and their variable will be inserted at the current cursor position in the template.
General Help for creating the New Template
Alert Templates: This is basically a framework (or scaffolding) which is combined with Alert Message to create a Complete Alert which is then delivered to the desktop.
Campaign owners use these templates to separate the visual design (html, images etc.) from the actual alert messages so that they can create the design framework one time and use that framework again and again in their alert messages. This saves a lot of time by eliminating need for re-typing of entire alert and also standardizing design for the campaign. Clients can create as many templates as they want and re-use these templates in their campaigns.
These Templates must contain Replacement Placeholders [like $alert_title, $alert_message, $alert_date , $alert_time etc.] which are then replaced by the actual data when the Alert is sent. You don't need to remember all these variables; you can just use the "Insert On-the-Fly Replacement Variables" Drop down Menu, Select and Insert that Replacement Placeholder into your template. Any template must have at least $alert_message placeholder for the actual Alert Message.
New Template: You can create New Alert Template in Simple Text Input Mode or Rich Text / HTML Mode. In Rich Text Mode, you will see WYSIWYG editor to design your Template while you will see simple text box in Simple Text Input mode.
Various Fields to create Alert Template are
- Template Title: This is the Title of Alert Template. This will be used for listing and selection purposes in the control panel. This will be the one which you will select when creating and sending alert messages.
- Template Data: This is the main data of the Alert Template which will be combined with Alert Message to create the Complete Alert.. You can use either Simple Text Input Mode or Rich Text / HTML Mode. You can put Full Web Page here or just the HTML elements as you desire in your alert messages. You should also add the Replacement Variables as required from the below drop down menu.
- Insert On-the-Fly Replacement Variables: These are the Placeholders for replacement of variables during the creation of actual alert message. You can just select any placeholder from drop down and click Insert to insert that placeholder into the template. During the creation of Alert Message, these placeholders will be replaced by actual data.
5.3 Create and Send Alert Messages
Login to your Control Panel and go to the “Alert Messages” page in the “ALERTS” Section. Here you will see all your current messages.
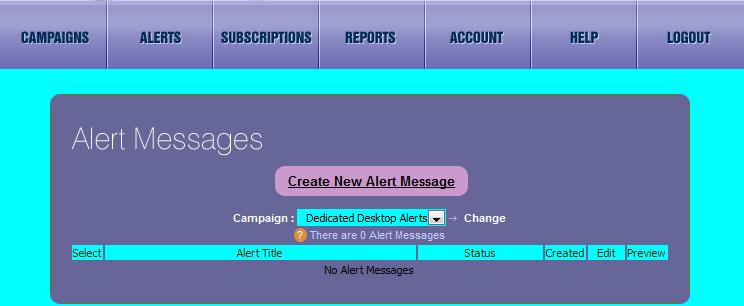
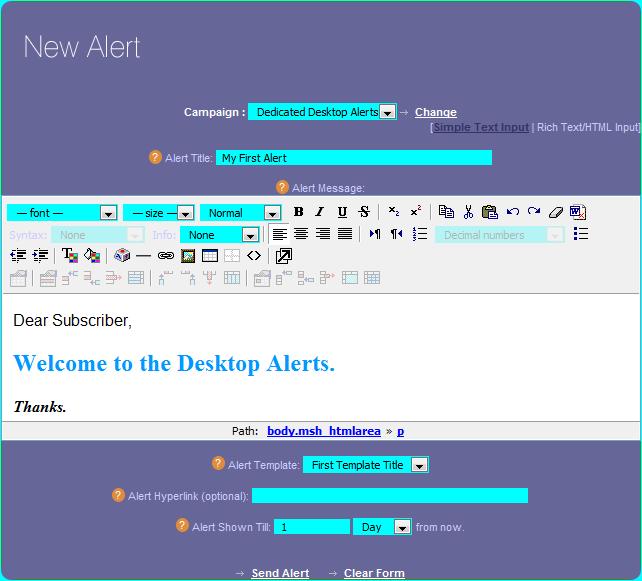
To create New Alert Message, click on “Create New Alert Message” and you will see New Message form which comprises a WYSIWYG editor, Alert Template Selector Dropdown, Alert Title and Expiry Period.
After filling in the Alert Title, Alert Message, Alert Template and Expiry Interval, click “Send Alert” and alert message will be sent to all the Campaign Subscribers.
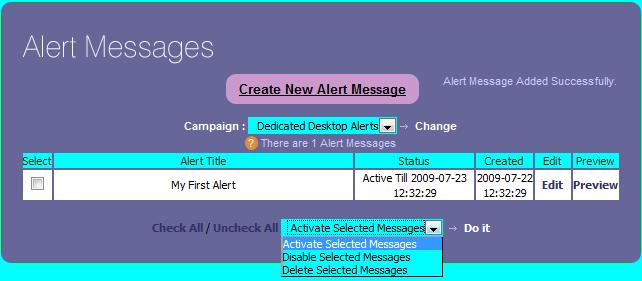
After posting message, you will be able to see its status on “Alert Messages” page. Here you can Edit the message or Preview it as it will appear on your subscriber desktop.
You will see the Title, Current Status, Creation and Expiry Date for each Alert.
You can also Activate / Disable / Delete any of the Alert Messages.
General Help for creating Alert Message
Alert Messages: These are the messages which appear on the subscriber's desktops.
These messages are often used along with Alert Templates to create different messages for the subscribers. You can place all the design elements of Alert like Fonts, Colors, and Sizes etc. in the template while actual text message can be typed in the Alert Message box. Further, you can create as many templates as you want and can use any of them while sending alerts.
New Alert Message: You can create New Alert Message in Simple Text Input Mode or Rich Text / HTML Mode. In Rich Text Mode, you will see WYSIWYG editor to type your message while you will see simple text box in Simple Text Input mode.
Various Fields to create Alert are
- Alert Title: This is the Title of Alert Message. This will be used for listing purposes in the control panel as well as placeholder replacement in the alert template [Replacement Placeholder: $alert_title]
- Alert Message: This is the main text of the Alert Message. You can both enter text as well as html in this field. If used along with template, it will be placeholder replacement in the alert template [Replacement Placeholder: $alert_message]
- Alert Template: This is the Alert Template which you want to use with this Alert. Please make sure that this template contains all the placeholders you need most essential being $alert_message.
- Alert Hyperlink: Here you can define Alert Hyperlink if you want. It will be placeholder replacement in the alert template [Replacement Placeholder: $alert_link]
- Alert Shown Till __ (Hour / Day / Month / Year) From Now: Here you can put the Alert Validity Period. For e.g. if you 1 in text box and select Hour in drop down, it becomes 1 Hour to Expiry and Alert won't be shown after 1 Hour from Now.
5.4 Check the Audit Reports
You can a whole range of Audit reports to choose from
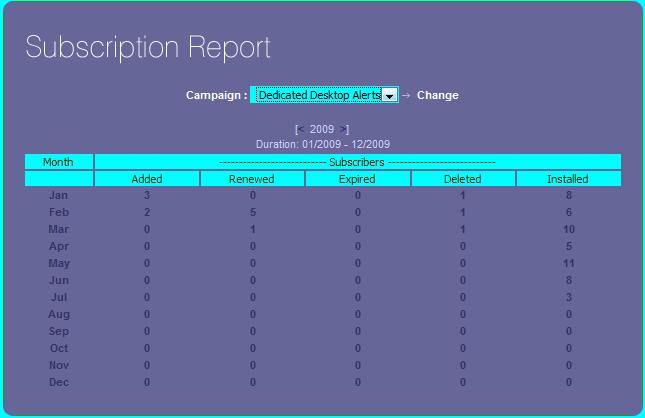
· Alert Subscriptions Report: This report shows Subscriptions added, deleted, renewed, expired and installed.
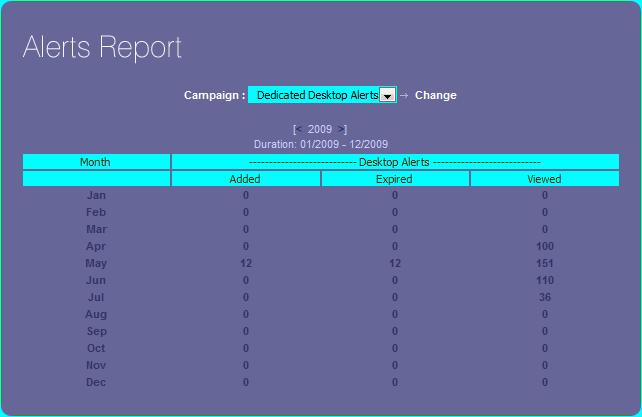
· Alert Messages Report: It shows Messages posted, viewed, expired.
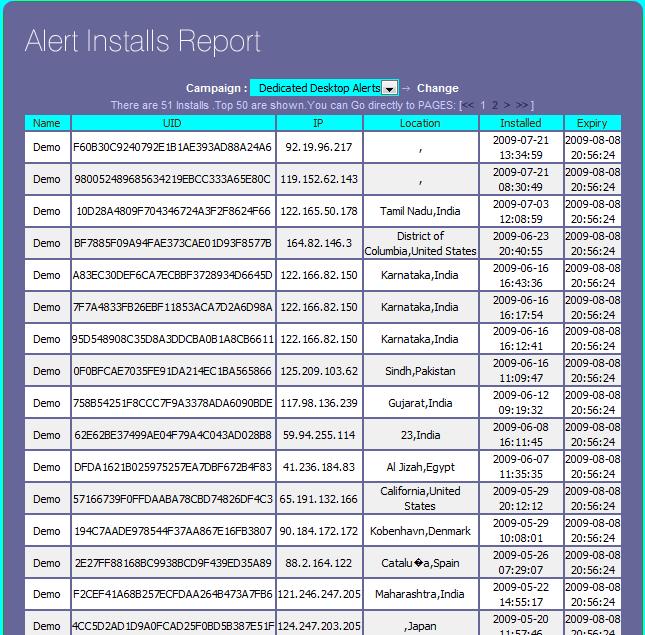
· Alert Installation Report: It shows Applications installed, their IPs, IDs, Location and Time of Install and Expiry.
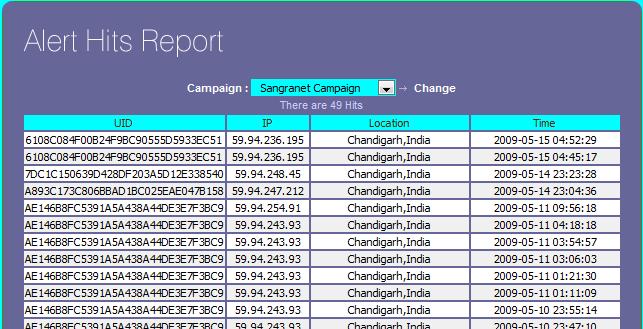
· Alert Hits Report: It shows Alert messages received, their IPs and time of receive.
You can view all these Reports in the “REPORTS” section
Alert Subscription Report
Alert Messages Report
Desktop Application Installation Reports
Alert Message Hits Report
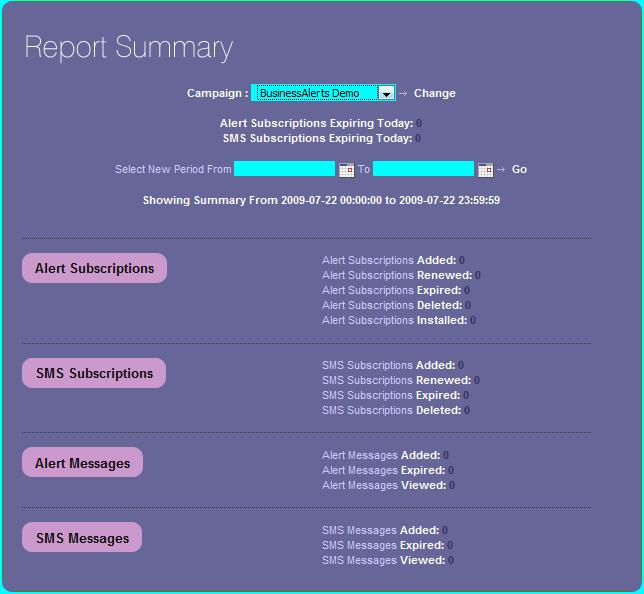
All Reports Summary
6. Sending SMS Messages
Simple steps for sending SMS Alert messages to your subscribers for the first time are
1. Create SMS Subscription (see Section 5.1) by adding the Subscriber Cell Phone number or Email Address.
2. Create New SMS Message (Section 5.3), and Send the Message.
6.1 Add & Manage Mobile Numbers
Login to your Control Panel and go to the “SMS Subscriptions” page in the “SUBSCRIPTIONS” Section. Here you will see all your current SMS subscriptions
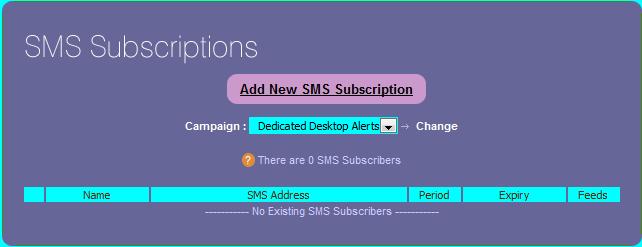
To add a new SMS Subscription, click “Add New SMS Subscription” and you will see the New SMS Subscription form.
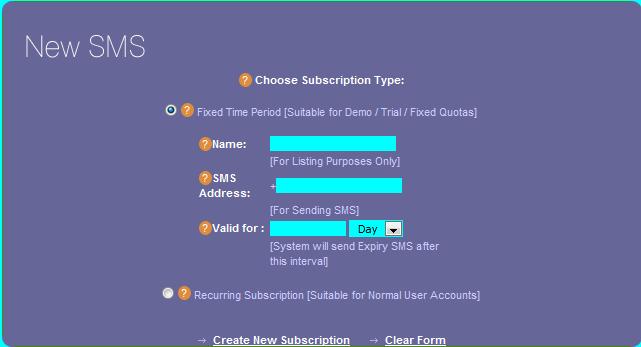
You can either create a Fixed Time Period Subscription Suitable for Demo / Trial / Fixed Quotas. This type of subscription expires after a fixed time period unless you manually renew it from the control panel.
Or you can create a Recurring Subscription [Suitable for Normal User Accounts]
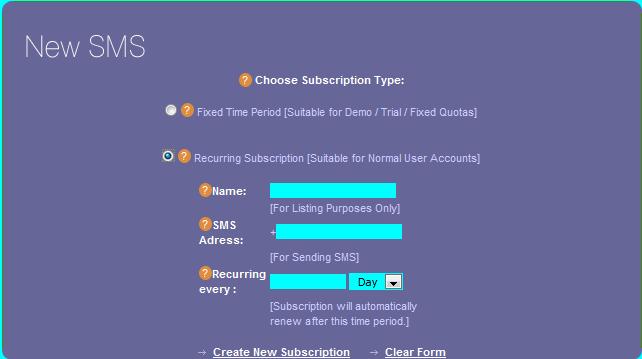
Recurring Subscriptions don’t expire and automatically renew after the given period. You will need to manually expire or delete this subscription whenever you need to disable that subscriber.
General Help for Creating SMS Subscriptions
SMS Subscriptions: These subscriptions are meant for managing your Campaign Mobile Subscribers which receive your message via SMS.
Typically you will create a sms subscription using your subscriber mobile phone number and start sending sms messages right away. Some cell phone service providers provide Email to SMS service in which email sent to particular email address is forwarded automatically as SMS to your subscriber's mobile phone number, in that case you may write that email address in place of SMS address in the form. You may even enter your subscriber email address if you want SMS message to be delivered to subscriber inbox.
New SMS Subscription: You can create New Fixed Period or Recurring SMS Subscription for each of your subscribers.
Subscription Types:
Fixed Time Period Subscription: This Subscription type is fixed time period subscription in which subscription expires after a defined time interval. This type of subscription is useful for creating demo or trial or group based alert solutions. Various Fields of this type of Subscription are
- Name: This is the Name of the Subscription just for listing purposes in the control panel so you can identify it later.
- SMS Address : This is the Mobile Phone Number with country code e.g. 44794712345 (44 is a country code) .If your subscriber is using Email to SMS service or wants to get SMS delivered to its email address, you can put that email address here instead of mobile phone number.
- Valid for __ (Hour / Day / Month / Year): Here you can define when this subscription will expire. If you put say 1 in the text box and select "Month" from drop down, it becomes 1 Month Subscription and it will expire 1 Month from Now. So, all your subscribers of this subscription will receive expiry notices 1 month from now and alerts will be stopped for their applications thereafter.
Recurring Subscription: This Subscription Type is generally used for normal individual subscriptions. This type of subscription automatically renews and does not expire till you manually expire it from SMS Subscriptions page. Various Fields of this type of Subscription are
- Name: This is the Name of the Subscription just for listing purposes in the control panel so you can identify it later.
- SMS Address : This is the Mobile Phone Number with country code e.g. 44794712345 (44 is a country code) .If your subscriber is using Email to SMS service or wants to get SMS delivered to its email address, you can put that email address here instead of mobile phone number.
- Recurring every __ (Hour / Day / Month / Year): This denotes the recurring period of the subscription. For e.g. if you 1 in text box and select Month in drop down, it becomes 1 Month Recurring Subscription and it will renew each month until you expire / delete it.
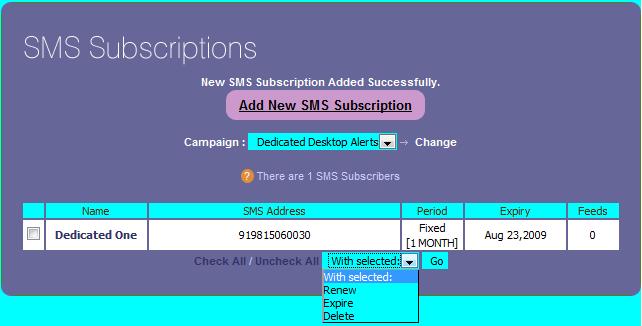
After adding subscription, you will be able to manage subscription (Renew / Expire / Delete) using dropdown provided.
6.2 Create and Send SMS Messages
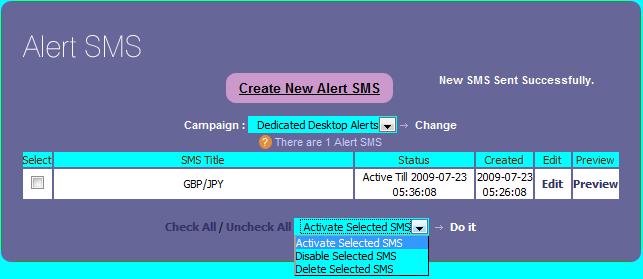
Login to your Control Panel and go to the “Alert SMS” page in the “ALERTS” Section. Here you will see all your current SMS Alerts.
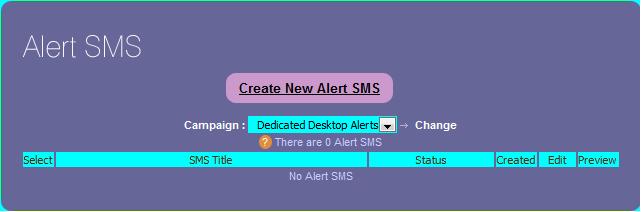
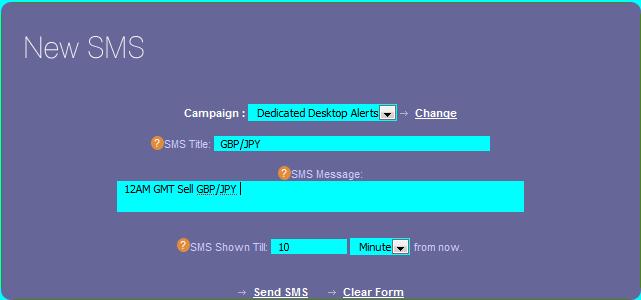
To create a New SMS Alert, click “Create New Alert SMS” and you will see the form to create the new SMS Message. Put in the SMS Title, SMS Message, Expiry Period and click “Send SMS” to see SMS Alert Message.
Since your SMS Messages will start delivering right away, there is not much use of editing and expiry period but still you can keep the area clean by deleting expired SMS messages.
General Help for Creating SMS Message
Alert SMS: These are the messages which appear on the subscriber's mobiles in SMS Format.
These messages are simple text messages which are sent to the subscriber's mobile phones. Due to restricted memory of mobile sms networks, ideally these messages should be less than 160 characters and contain no special characters.
New SMS: You can create New SMS Alert message by entering the text message you want to send to your subscribers.
Various Fields to create SMS Alert are
- SMS Title: This is the Title of SMS Message. This will be used for listing purposes in the control panel.
- SMS Message: This is the main text of the SMS Alert. You should only enter text in this field without any special characters and keep the no of characters less than 160 otherwise messages will be truncated.
- SMS Shown Till __ (Hour / Day / Month / Year) From Now: Here you can put the SMS Validity Period. For e.g. if you 1 in text box and select Hour in drop down, it becomes 1 Hour to Expiry and SMS won't be send after 1 Hour from Now.
6.3 Check the SMS Audit Records
You can a whole range of Audit reports to choose from
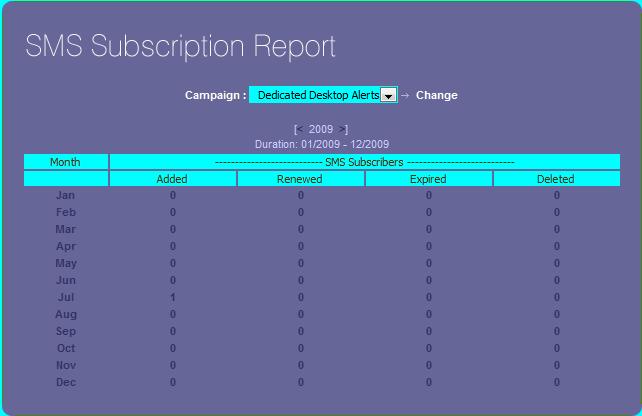
· SMS Subscriptions Report: This report shows SMS Subscriptions added, deleted, renewed and expired.
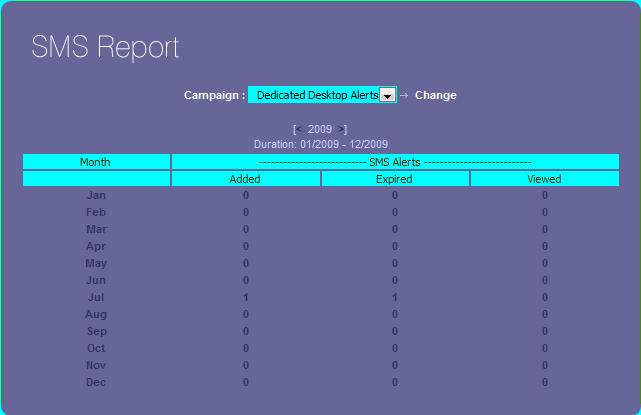
· SMS Messages Report: It shows Messages posted, viewed, expired.
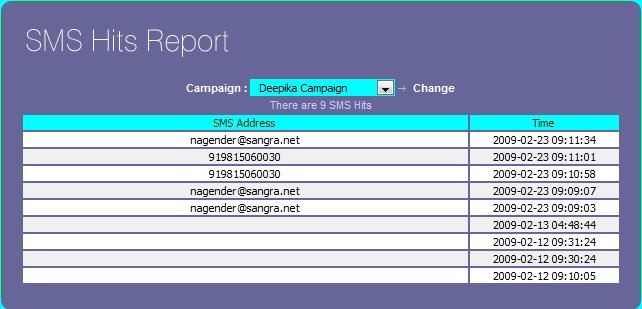
· SMS Hits Report: It shows Alert messages received, their IPs and time of receive.
You can view all these Reports in the “REPORTS” section
SMS Subscriptions Report
SMS Messages Report
SMS Hits Report
7. API Usage
Desktop Alerts API is useful for developers who wish to create their own programs to interface with the Desktop Alerts Control Panel.
We already have a program called Desktop Alert Administrator (see Section 6) which uses this API to post Desktop and SMS Alerts.
7.1 Who needs it?
Anyone who wishes to directly interface with the Alerts Database rather than using the Control Panel and its web pages. It can be any script or any desktop program or anything else which can be used to access API.
7.2 How it works?
You will require API Credentials from “API Details” page in “Account Section”.
First time users will have to request API credentials by clicking on the “Request API Credentials” link and their unique API Credentials are auto generated and available for usage.
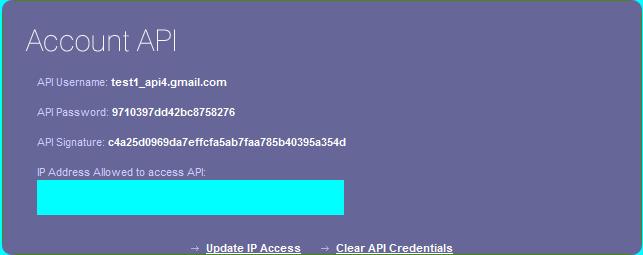
After noting the API Credentials in a secure place, you can start creating your own implementation of API.
You can see all API Technical Documentation and Examples here. http://www.alertsdesktop.com/forum/viewforum.php?f=17
8. Desktop Alert Administrator
Desktop Alert Administrator is a simple tool to post alert messages right from the desktop application without going to the Control Panel. It saves quite a bit of time when you can large no of messages to post to your subscribers. It works using Alerts API so you will require the API Credentials in order to make it work.
8.1 Pre-Requisites
· Windows XP (SP2 or later) / Windows Vista / Windows 7
· API Credentials (API Username, Password and Signature)
8.2 Installation & Activation
Installation is by simple windows based installer which will install application at place of your choice.
After installation, you will see the Activation Screen where you will have to provide your API Credentials (see Section 5)
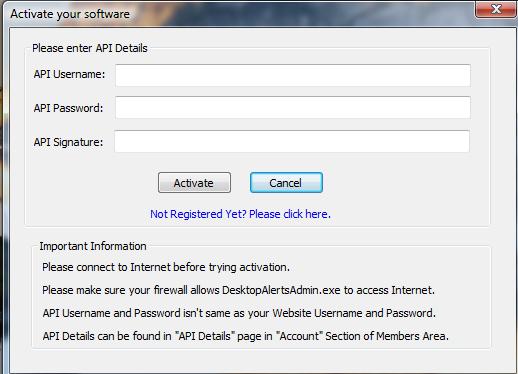
After filling in the info, just click Activate and it will verify your information and show you the success message.
8.3 Sending Desktop & SMS Alert Messages
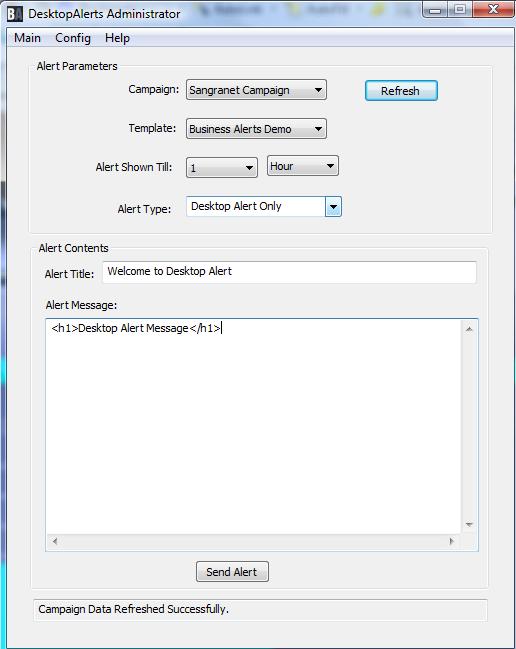
After activation, just click “Refresh” and it will fetch all the campaign and template data from your account. Then you can just select Campaign, Template, Expiry Period and choose Desktop Alert only / SMS Alert Only / Combined Desktop and SMS alert.
After filling Alert Title and Alert Message, just press “Send Alert” and application will attempt to send Alert Message using API. You will see success / failure status in the Status bar at bottom of the application.
9. Optional Features
9.1 Alert RSS / XML Feeds
These are the RSS XML Feeds from which Alert Messages are fetched.
These are simple RSS XML Feeds which contains the Alert Titles and Messages as its elements. This XML Feed is parsed and various pairs of Alert Title and Alert Message is derived from it and sent to the subscribers. This enables Campaign Owners to include external RSS Feeds (from their own website or some other source) as source of their Alert Messages.
Login to your Control Panel and go to “Alert Feeds” page in “ALERTS” section. You will see list of current Feeds if you have added any feed earlier.
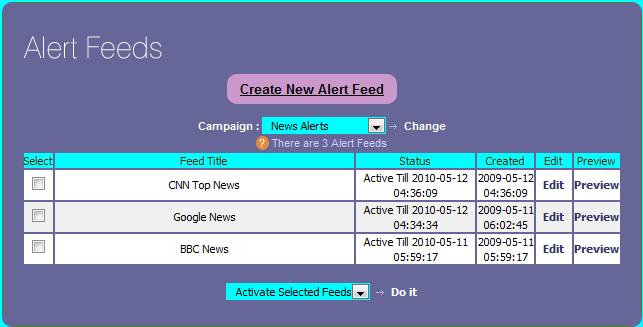
To add a New Feed, click on “Create New Alert Feed” and you will see a form to add New Feed.
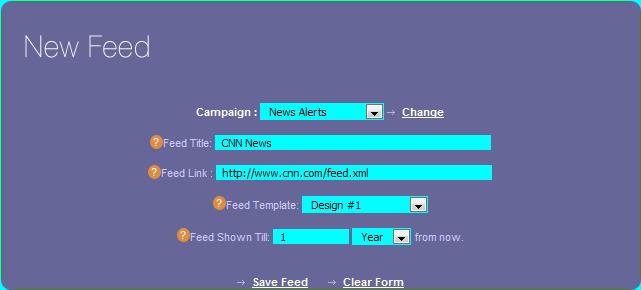
General Help for Creating New Feed
New Feed: You can add a New Alert Feed to your compaign by adding below parameters.
Various Fields to create RSS Feed are
- Feed Title: This is the Title of this Alert Feed. This will be used only for listing purposes in the control panel.
- Feed Link: This is the actual RSS XML hyperlink for this feed. Usually it is something in the form of http://www.somewebsite.com/somepage.xml but can be anything which gives RSS XML output.
- Feed Template: This is the Alert Template which you want to use for Alert Messages fetched from this Feed in order to generate complete Alert. You can select any Template from the drop down of all your Alert Templates.
- Feed Shown Till __ (Hour / Day / Month / Year) From Now: Here you can put the Feed Validity Period. For e.g. if you 1 in text box and select Hour in drop down, it becomes 1 Hour to Expiry and Feed won't be fetched after 1 Hour from Now.
9.2 Alert Surveys
Alert Surveys are a great way to get your subscriber opinion on any matter and it is very easy to quickly create and send the various kinds of Surveys to your subscribers. Your subscribers will get notification of surveys and they will be able to submit their survey opinions right from within desktop alert software itself and you will be able to see the individual as well as summary results of all your surveys in the Members Control Panel. You subscribers will also have the ability to submit the surveys at their own chosen times as well as decline the surveys.
To see all the current surveys, login to the control panel and go to “Alert Surveys” in “ALERTS” Section.
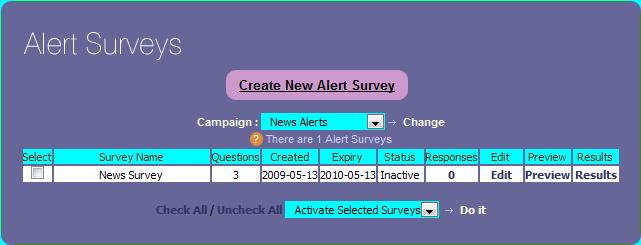
To create a New Survey, click on “Create New Alert Survey” and you will see the form to setup the Survey.
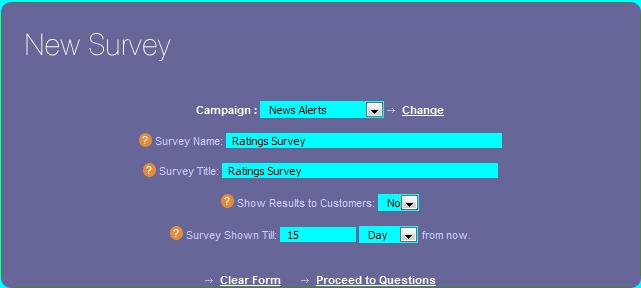
Firstly, you will see page to setup General Survey Parameter i.e. Campaign, Survey Name, Title, show results to subscribers after they complete the survey and the time till which survey remains valid.
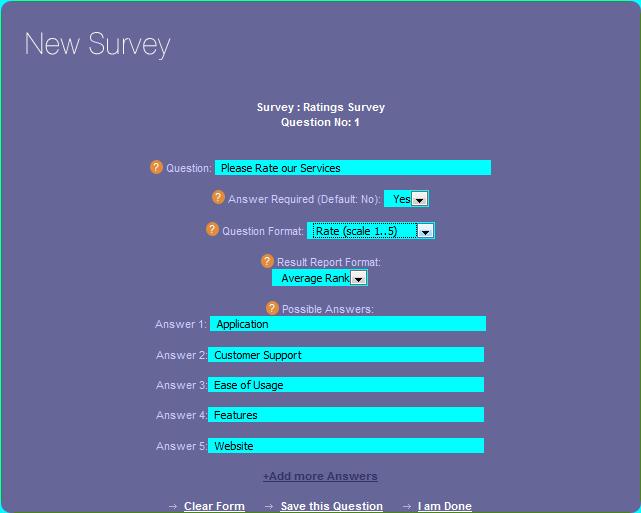
Then you will proceed to add Questions, Response Types and Possible Answers to the Survey. You will also specify whether Answer is required or not, if required, survey will not proceed forward without getting answer to this question. Question Format will decide the Result Report Format options available. You can add any no. of possible of answers and Save the Question. You can repeat this step and add any no. of questions and finally click “I am done” link to Save the Survey.
Then you can Preview the Survey and if it looks all right, make it “Active”.
General Help for Creating Survey
Various Fields to Create Survey are
- Survey Name: This is the Name of Survey. This will only be used for listing purposes in the control panel.
- Survey Title: This is the Title of the Survey. This will be shown at the Top of the Survey above the Question on each page of the survey.
- Show Results to Customers: If you select "Yes" in this field, your subscriber will be able to see the Survey Results at the end of the Survey otherwise simple Thank you message will be displayed.
- Survey Shown Till __ (Hour / Day / Month / Year) From Now : Here you can put the Survey Validity Period. For e.g. if you 1 in text box and select Hour in drop down, it becomes 1 Hour to Expiry and Survey won't be shown after 1 Hour from Now.
Various Fields for Each Survey Question are:
- Question: This is one of the Questions of the Survey. This will be shown on the Survey page and possible Answers will be shown after this field.
- Answer Required (Default: No): If you select this as "Yes", then survey won't move forward for your subscriber until he/she answers this question. If set to No (default choice), subscriber may choose to skip this question.
- Question Format: Here you can select how your Answer choices will be displayed i.e. whether in form of Check boxes, Radio buttons, Text entries etc. Please keep in mind the nature of question while deciding this field. Possible Result Format (next field) will also depend upon this choice.
- Result Report Format: This will be format in which you and your subscribers will see the Results of the Survey. You will see possible Result Format Types after you select Question Format.
- Possible Answers: Put all the possible Answers here, one in each line. You may add more answers if need be by clicking the "Add more Answers" link.
Survey Results
· Summary Results for each Survey can be seen by clicking “Results” on “Alert Surveys” page.
· Subscriber wise Results can be seen by clicking the link in the “Responses” column.
9.3 Personal Alert Messages
These are the alert messages which appear only on the selected subscriber's desktops.
This feature is used to send personal and group alerts to one or more subscribers. Rest all the features are same as that of regular Alerts. You can place all the design elements of Alert like Fonts, Colors, and Sizes etc. in the template while actual text message can be typed in the Alert Message box. Further, you can create as many templates as you want and can use any of them while sending alerts.
Click on “Personal Messages” link in “ALERTS” Section and you will see page showing current Personal Messages.

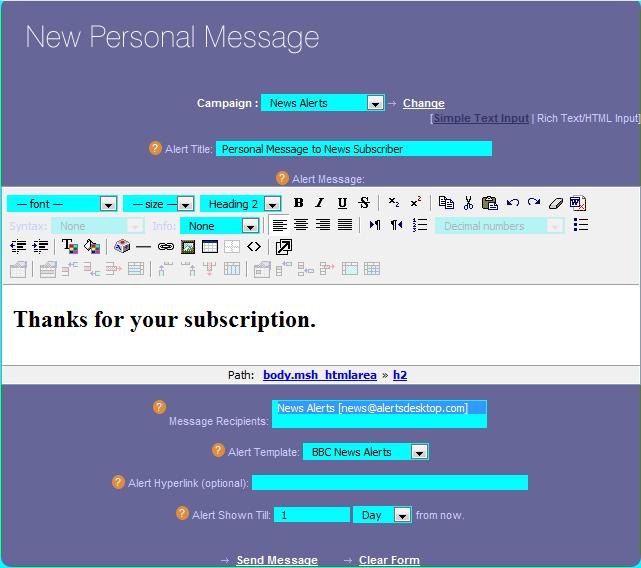
To add New Personal Message, click “Create New Personal Message” and you will see the New Message creation Form.
General Help for Creating New Personal Message
New Personal Message: You can create New Personal Message in Simple Text Input Mode or Rich Text / HTML Mode. In Rich Text Mode, you will see WYSIWYG editor to type your message while you will see simple text box in Simple Text Input mode.
Various Fields to create Personal Message are
- Alert Title: This is the Title of Alert Message. This will be used for listing purposes in the control panel as well as placeholder replacement in the alert template [Replacement Placeholder: $alert_title]
- Alert Message: This is the main text of the Alert Message. You can both enter text as well as html in this field. If used along with template, it will be placeholder replacement in the alert template [Replacement Placeholder: $alert_message]
- Message Recipients: These are the Subscribers which will receive this Personal Message. You can select one or multiple subscribers by Ctrl-Left Clicking the Subscribers Dropdown.
- Alert Template: This is the Alert Template which you want to use with this Alert. Please make sure that this template contains all the placeholders you need most essential being $alert_message.
- Alert Hyperlink: Here you can define Alert Hyperlink if you want. It will be placeholder replacement in the alert template [Replacement Placeholder: $alert_link]
- Alert Shown Till __ (Hour / Day / Month / Year) From Now: Here you can put the Alert Validity Period. For e.g. if you 1 in text box and select Hour in drop down, it becomes 1 Hour to Expiry and Alert won't be shown after 1 Hour from Now.
9.4 Encrypted Alerts (256 bit)
These are Alerts which are encrypted before sending and decrypted only at client desktop for which alert is meant for.
Program uses “Authenticated Encryption” which ensures
· Privacy of Data – by Encrypting data using 256 bit encryption
· Authenticity of Data – by adding Authentication layer to prevent Data tempering
This feature has to be added at the Campaign level, so client has to specify that it needs Encryption while creating a New Campaign.
10. Help
10.1 FAQs
All current FAQs about Desktop Alerts are available at this link http://www.alertsdesktop.com/forum/viewforum.php?f=12
10.2 Forum
Desktop Alerts Forums are one stop place for viewing all information about Desktop Alerts.
http://www.alertsdesktop.com/forum
10.3 Call Us
You can reach our Chandigarh, India Office at +91.98150.60030
10.4 Chat with us
You can chat with us using Live Help on http://www.alertsdesktop.com or we can arrange talk and chat sessions using Yahoo / Skype / Gtalk etc. with prior appointments.
10.5 Email Us
For Sales and General Purpose Queries, please mail deepika at business-alerts.com
For Technical Queries, please mail nagender at sangra.net